1. How can I request a brand lift study?
To request a brand lift study for your campaign in Ad Manager, follow these steps:
DISPLAY
Start by configuring your display campaign (Banners or Seamless) in Ad Manager. While setting it up, you will get the following message when the budget is exactly or more than €10,000.

Fill in the name of the brand you’d like to run the brand lift for, this could also be a service or product from the brand (in line with the campaign).
What happens next?
The Programmatic & Platform Team will review your request (this process will take a maximum of one business day) and if necessary, will adapt the suggested main question and corresponding answers for the study. The main question and answers follow Brandmetrics' best practices. We strongly recommend avoiding major alterations, as they could significantly impact the results.
Survey confirmation
Once the brand lift study has been approved and set live by the Programmatic & Platform team, and the campaign is live, the status will change from ‘Upcoming’ to ‘Collecting’.
Results
The results can be consulted directly in Ad Manager, in the campaign overview screen. This process can take up to one week after the end date of the campaign.
VIDEO
Send your request to run a brand lift study to the Programmatic & Platform Team:
digital.programmatic-mln@dpgmedia.be
Include the following campaign information in your email:Product: Specify the product being advertised (Full CTV / Streaming / SF / RON / Display) and whether you’d like it for the northern or southern* part of Belgium.
Start/end date: Provide the campaign timeframe.
Budget: Share the allocated budget for the campaign.
Selected targeting: Indicate the audience you intend to reach.
Campaign type: Specify the goal of the campaign (e.g. awareness, consideration, ...).
*) Brand lifts are not possible for RON video south.
What happens next?
The Programmatic & Platform Team will review your request and, if the campaign qualifies for a brand lift study, they will provide the required tracking pixel(s) along with the suggested main question and corresponding answers for the study.
Survey confirmation
Please review the proposed survey and confirm if you have no remarks. The main question and answers are created by our research team following Brandmetrics' best practices. We strongly recommend avoiding major alterations, as they could significantly impact the results.
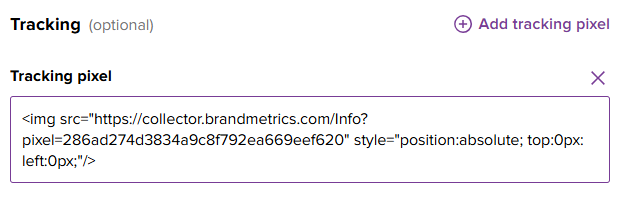
Once confirmed, you can add the pixel(s) to the creative(s) of the corresponding campaign. (The technical implementation in Ad Manager is covered in the next chapter)
2. Where and how to implement pixels - Video campaigns
Full CTV and Streaming
If your campaign is a Full CTV or a Streaming campaign in the northern or southern part of Belgium, you will receive five different tracking pixels. Follow these steps to implement them correctly:
Step 1: Adjust the duration in the impression pixel
You’ll need to update the spot length of your creative within the Impression Pixel before proceeding.
Tag example:
https://c.bmtrcs.com/v1/95fede703a8d4b44bd74fb804b240e41/ev/100?uid=#e{request.keyValue("_fw_vcid2")}&did=#e{request.keyValue("_fw_vcid2")}&ip=#e{request.clientAddress}&ua=#e{request.userAgent}&ifa_type=#{request.deviceIdType(iab)}&gdpr=false&dnt={dnt}&lmt={lmt}&app_bundle=#{section.attribute("appBundle")}&dur=#{ad.creative.rendition.duration}
If your creative has a 15-second spot length, adjust the Impression Pixel as follows:
From: &dur=#{ad.creative.rendition.duration}
To: &dur=15
Step 2: Add pixels in Ad Manager
Access your Ads section in Ad Manager
Open your Ad Manager account.
Either create a new creative or click on an existing creative intended for the campaign.

Add the Impression Pixel
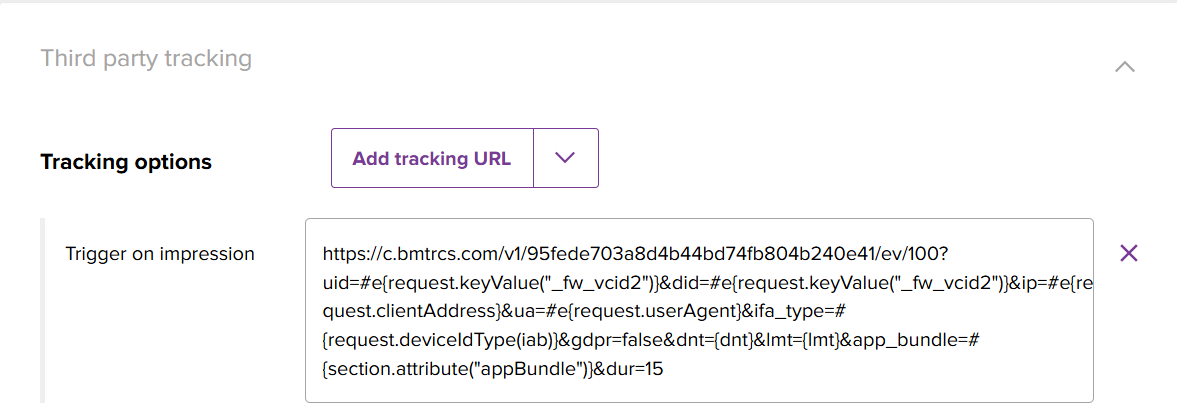
Scroll down to the Third Party Tracking section.
Click on Add Tracking Pixel and select On Impression.
Paste the adjusted Impression Pixel into this field.
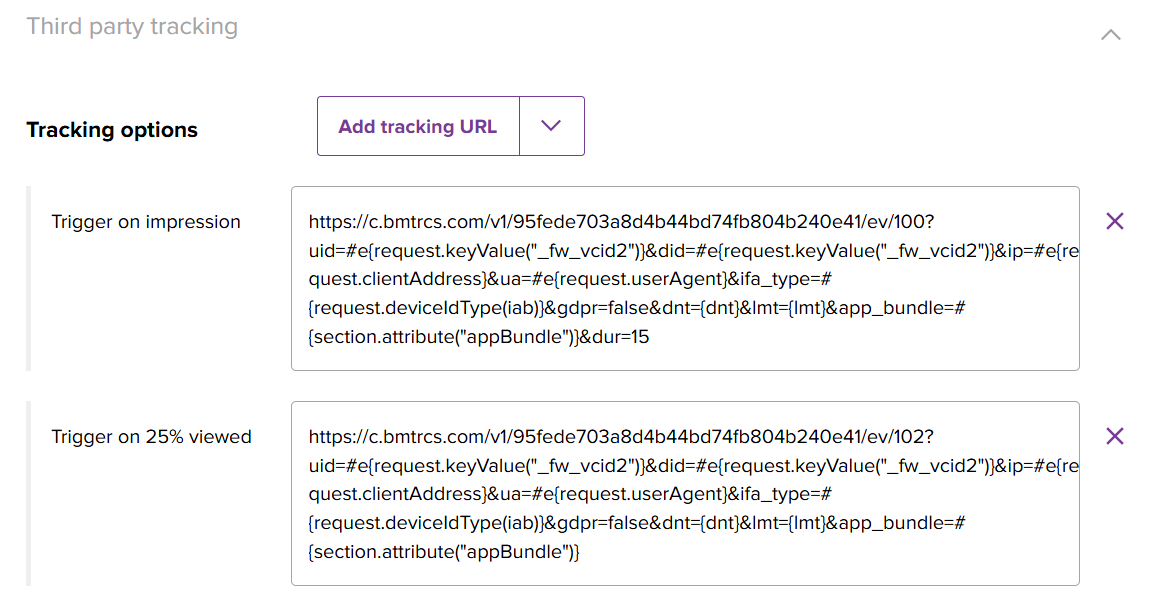
Add additional tracking pixels
Repeat the Add Tracking Pixel process and select the relevant options for:
25% viewed (First Quartile Pixel)
50% viewed (Midpoint Pixel)
75% viewed (Third Quartile Pixel)
100% viewed (Completed Pixel)
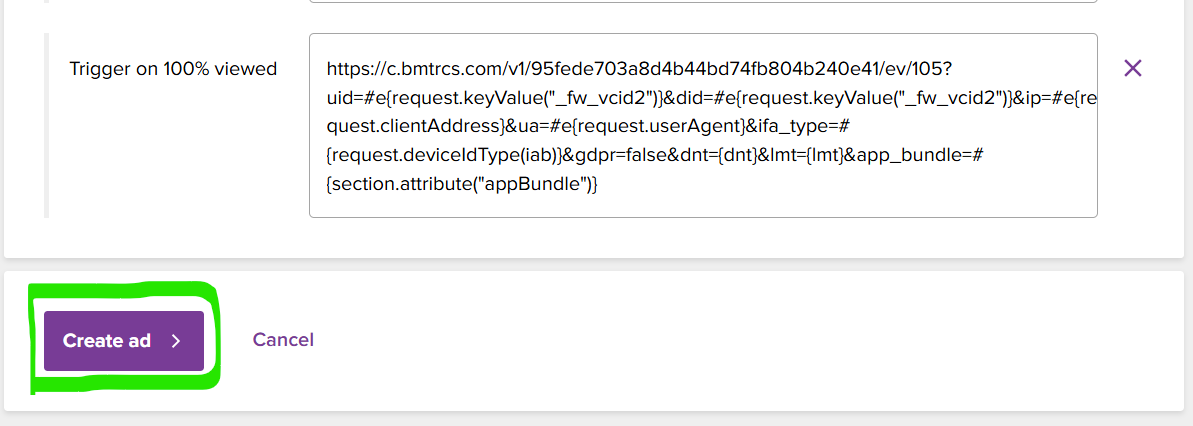
Finish the creative setup
Once all pixels are added, click the Create Ad button to finalize.
RON and SF
If your campaign is a RON video or short form video campaign, you will receive one single pixel. Follow these steps to implement the pixel correctly:
Step 1: Add pixels in Ad Manager
Access your Ads section in Ad Manager
Open your Ad Manager account.
Either create a new creative or click on an existing creative intended for the campaign.

Add the Impression Pixel
Scroll down to the Third Party Tracking section.
Click on Add Tracking Pixel and select On Impression.
Paste the provided Impression Pixel into this field.
Finish the creative setup
Once the pixel has been added, click the Create Ad button to finalize.

3. What if I receive an error message?
If you encounter errors during implementation, don’t hesitate to reach out for support directly via the support channel in Ad Manager. Click the question mark icon (top right corner) for assistance:

Was this article helpful?
That’s Great!
Thank you for your feedback
Sorry! We couldn't be helpful
Thank you for your feedback
Feedback sent
We appreciate your effort and will try to fix the article