Ad Manager Instructions
Requirements
Some tracking configurations are required in order to measurement server-side conversions.
For more information about server-side tagging, read this article.
Tag manager (web)
- Use a subdomain that matches your site. Using a CDN so your the origin of your site is the same as tag manager is highly recommend. (Otherwise the cookie lifespan is limited to 7 days in some browsers)
- Use a consent management platform. Support of Consent Mode v2 is highly recommended.
Tag manager (server)
- Use a private server or hosted solution to run a server containers.
- Use the Ad Manager server-side template for GTM (follow these instructions)
Ad Manager
- Append click macro to landing page of URL. See below.
Step-by-step Guide
1. Create Conversions
To create a conversion there are two options.
- Click on “Measurement” in the main navigation menu
- In the tab “Conversions” click “Create conversion”
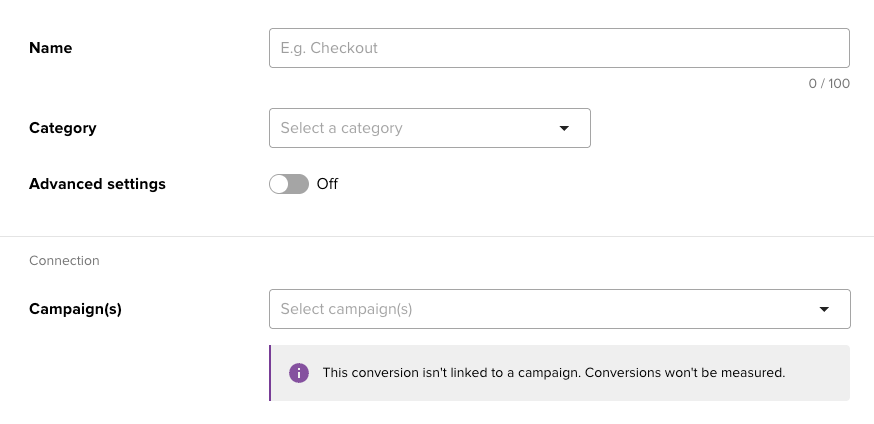
- Fill in a name that reflects the conversions.
- Select a conversion category. Ad Manager supports:
- Landing page - user visits a specific URL
- View item - user views a specific product, service or offer
- Add to cart - adds a product or service to a shopping cart
- Checkout - user starts the checkout process
- Lead - user shares personal details like email, phone number, etc.
- Select one or multiple campaigns for which you want to measure conversions.
There is also an “Advanced settings” section which allows you to modify certain behavior.

- The lookback window is the period - after a user clicked an ad - during which a conversion can be attributed. The longer the period the more conversions can be attributed. The maximum is 90 days.
- Repeat conversions allows you to specify if a user can do multiple conversions on the same conversions.
2. Link Conversions to Your Campaign
You can link conversions to one or multiple campaigns when you create a conversion. Or you can link a conversion to your campaign when creating or editing a campaign. All existing and newly created ad groups within those campaigns will measure conversions.
3. Modify Landing Pages of Your Ads
An ad server macro needs to be appended to your landing page. So an ad interaction (click) can be linked to conversions that take place on your website. Some Seamless ads - like the Carousel - support multiple URLs. If you used multiple URLs or used a URL more than once, all of those URLs should be updated accordingly.
Seamless and IAB Ads
Go to ads and create a new ad. Select the (sub-type) and configure your ad accordingly. Seamless and IAB ads are supported. If you selected “Seamless” as an ad type, then select the Seamless type you would like to use. Seamless Image, Carousel, and Listing are recommended. For “IAB” ads select the type “Image” or “HTML5”.
Some seamless ad types - like the carousel - support multiple landing pages. For each landing page (if configured per slide) the conversion macro needs to be appended.
For regular URLs append this the parameter
token=${SSP_DATA} Example: https://www.advertiser-website.nl/?page=product&token=${SSP_DATA}
Third party tags and click trackers - CM360
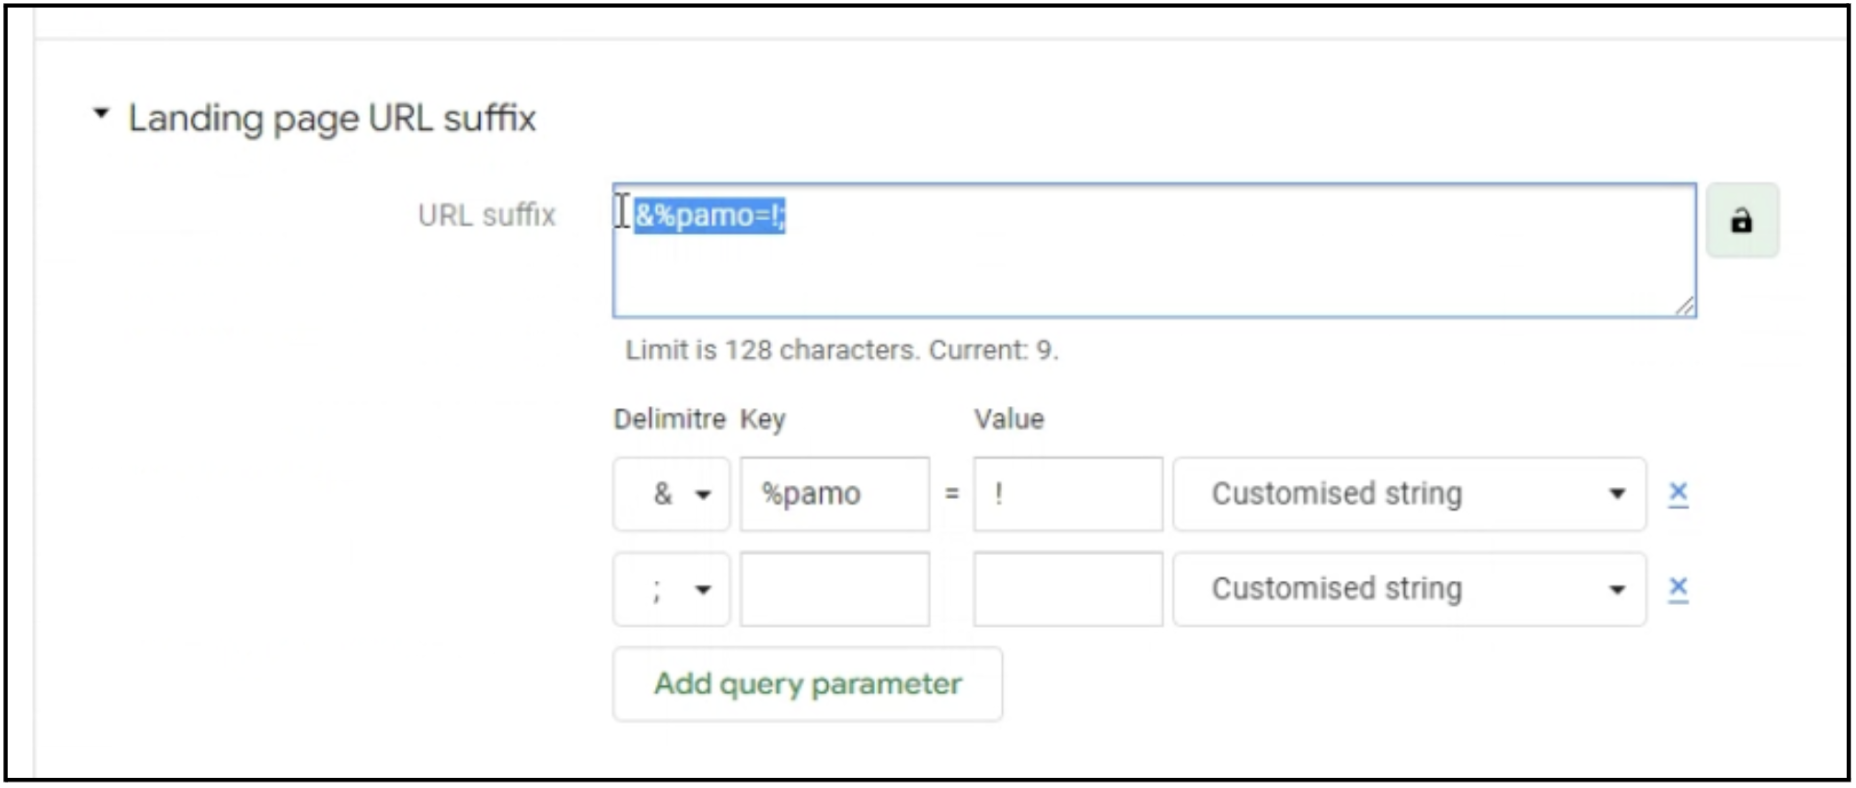
Landing pages are handled differently when using 3rd party platforms, we need to make sure the Ad Manager conversion click macro will be appended automatically to the URL. CM360 offers the possibility to add a landing page URL suffix that automatically appends a string of key-value parameters (such as UTM tags or click IDs) to the end of your ad's destination URL.
This allows you to pass tracking data to external platforms seamlessly. You can also set this globally at the advertiser level or at the individual Ad/Creative level, depending on how you want your data segmented. Campaign level is the most common placement, defining standard tracking for a specific initiative.
- Navigate to your specific Campaign in CM360.
- Click on Properties.
- Scroll down and expand the Landing page URL suffix section.
- In the Landing page URL suffix settings, include %pamo!; in the URL suffix field.
Within the Ad ad itself that is assigned to the placement make sure the URL suffix is assigned:
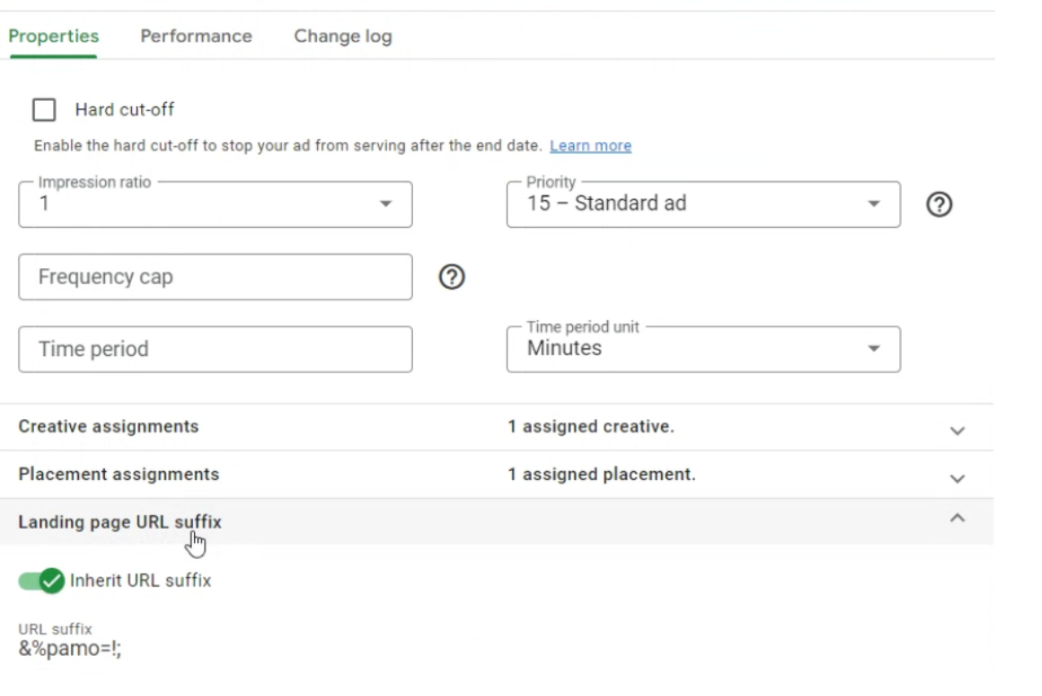
Then when exporting the tags for Ad Manager make sure you add this line:
data-dcm-param-amo='token=${SSP_DATA}'The following is an example of a Google Campaign Manager 360 ins tag as it appears in DSP.
<ins class='dcmads' style='display:inline-block;width:160px;height:600px'
data-dcm-placement='N1234.12345678ADVERTISER/B12345.12345'
data-dcm-rendering-mode='script'
data-dcm-https-only
data-dcm-resettable-device-id=''
data-dcm-app-id=''
data-dcm-click-tracker='${CLICK_URL}'
data-dcm-param-amo='token=${SSP_DATA}'
>
<script src='https://www.googletagservices.com/dcm/dcmads.js'></script>
</ins>
If you are using DCM to track your clicks (which starts with https://ad.doubleclick.net/ddm/trackclk/. etc.), then append this to the tracking URL:
;dc_pamo=token%3D${SSP_DATA}Third party tags - Weborama
So this part is required:
,publisherclick  : '${CLICK_URL}'
,clicks : ['https://www.yourlandingpage.nl?token=${SSP_DATA}']
Full tag:
<script type="text/javascript">
var weboDisplay = {
  organization_id : 'XXX'
  ,tag_id : 'XXX'
  ,request_id : ''
  ,external_id : ''
  ,random : '${AUCTION_ID}'
  ,width : 1
  ,height : 1
  ,burst : 'always'
  ,gdpr : '${GDPR_CONSENT_284}'
  ,imptrackers : []
  ,clicktrackers : []
  ,publisherclick : '${CLICK_URL}'
  ,clicks : ['https://www.yourlandingpage.nl?token=${SSP_DATA}']
};
(function weboStart(){
varweboLaunch = document.createElement('script');
weboLaunch.type = 'text/javascript';
weboLaunch.src = 'https://media.adrcdn.com/scripts/15/webodisplay_launch_1.5.0_scrambled.js';
document.currentScript.parentNode.insertBefore(weboLaunch, document.currentScript);
}());
</script>
Third party tags - Pexi
For Pexi the same applies as for Weborama. Except the tags structure is slightly different:
'click': 'https://www.example.com?token=${SSP_DATA}',
'mediaURL': 'https://ads.pexi.nl/xxxx/',
Full tag:
<script type="text/javascript" id="pexi-tag">
var pexiAd = {
  'id': xxxxx,
  'width': 970,
  'height': 250,
  'cacheBust': '${AUCTION_ID}',
  'clickTracker': ['${CLICK_URL}'],
  'click': 'https://www.example.com?token=${SSP_DATA}',
  'mediaURL': 'https://ads.pexi.nl/xxxx/',
  'gdpr': '${GDPR}',
  'gdpr_consent': '${GDPR_CONSENT_516}'
};
document.write('<scrip'+'t src="https://static.pexi.nl/3.3/hpto.js"></scrip'+'t>');
</script>
4. Implement the server-side GTM template
Use the Ad Manager server-side template for GTM (follow these instructions).
Was this article helpful?
That’s Great!
Thank you for your feedback
Sorry! We couldn't be helpful
Thank you for your feedback
Feedback sent
We appreciate your effort and will try to fix the article